A Kitchen Designed for Connection: The Oakbriar Project


In the history of Cramer Contracting, the project that is most near and dear to my heart is The Maida Kitchen, which was completed in February of 2023. And I will explain the why and how this project came to be in this article.
The homeowners with their young family felt cramped and constricted in their old kitchen. The kitchen was separated from the usable space of the ‘dining room’ and was also separated from the expansive livingroom. There was no cohesiveness. And the builder-grade kitchen lacked storage, countertop space and a personality.
Removal of Load Bearing Walls
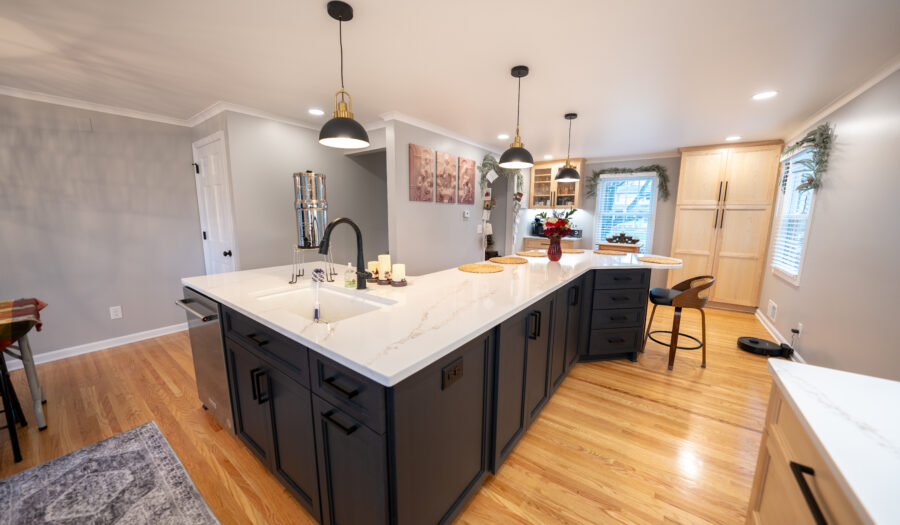
Arguably the most important feature of this kitchen was the removal of a 10’ weight bearing wall. With the blessing of our architect, we removed two walls, one weight bearing and one non-weight bearing. The weight bearing wall required Three 17-foot, 12” wide LVL headers to be installed.

Additionally, we had to install a Lolly-column in the basement to direct the point load to the foundation. It was quite an undertaking but WHAT a difference it made! Removing walls is one of my favorite recommendations to transform a space from dark and constricted to open and inviting. Don’t be afraid to dream big and shoot for the stars when it comes to your remodel. Where there’s a will, there’s a way to remove walls, create new spaces and solve problems.

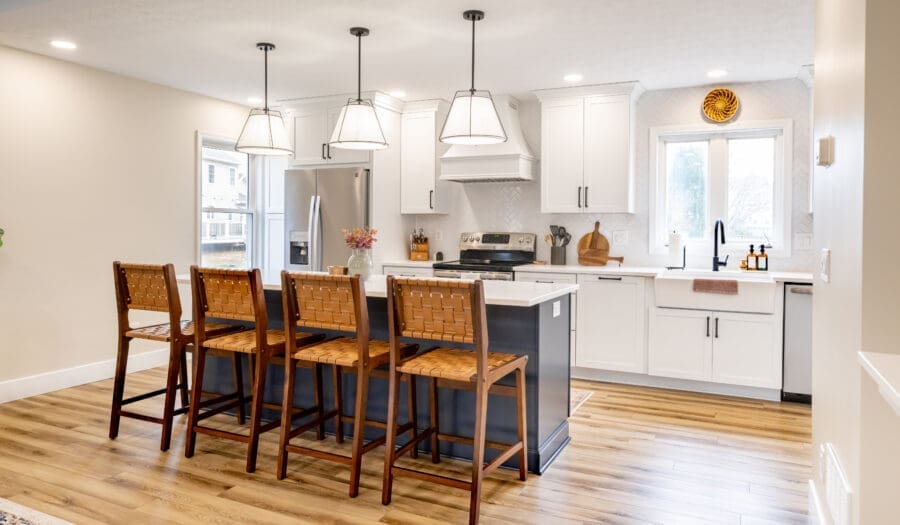
Large and Unique Colored Island
The island was a dark navy and was a unique and classy contrast to the white shaker cabinets. The homeowners and cabinet designer planned ahead for the installation of a mini-fridge and built in microwave cabinet. The location of the island and the countertop overhang allows for seating while guests can participate in the kitchen conversations or the livingroom conversations. Rose gold hardware was a excellent choice to contrast the cabinets.

Fantastic customers with a sense of style
Admittedly, I did not pick out the rugs, chairs, pendant fixtures above the island or any ‘custiomizable’ But I am appreciative of the homeowners sense of style in how these selections made the whole room come together. They, with wall treatments, pictures and furniture unified the livingroom with the kitchen after the removal of the weight bearing wall. As an added bonus, the customers with their young family could not have been nicer, more patient or more accommodating to work for.

Copious lighting on dimmers
Nothing makes a space pop like good lighting. We always err on the side of more than than less because you can always add a dimmer and have less lighting. If your dimmers are cranked to the max and you don’t have enough hardwired light fixtures, you’re relegated to lamps. In this space, more than enough color-selectable 6” LED were used as well as classy pendant lights and under cabinet lighting to add ambiance to the room.
Elegant Backsplash to new heights!
The customer chose a small subway tile in a herringbone pattern that was taken all the way to the ceiling to give the kitchen an even more grand feel. Installed behind the range hood (another well planned design feature) and above the sink, it’s both stylist and serves a practical function to ensure the backsplash is easy to keep the clean.

Other noteworthy features:
The countertops were white quartzite and were installed by local company EGC Granite, who were very easy to work with. The floors were selected to match the LVP floors in the customer’s finished basement. The 600 sq. Ft needed was arguably the last inventory in the state of New York and was sourced a Lowe’s Home Improvement in Utica, NY. Something else that Cramer Contracting is experienced with is eliminating a window. There was an existing window that had to be eliminated to allow for a 1-wall kitchen design.

The picture above and below were taken from the same angle and position in the home, before and after.

Time to Completion: ~6 Weeks
Approximate total cost of a project this size: $75-100k.